guides
Claude Design: Design for the Rest of Us
Everything you need to know to start using Claude Design — prototypes, pitch decks, landing pages, images, and more. Including the token warning nobody else will tell you about.
Claude Design: Design for the Rest of Us
Claude Design is what happens when you no longer need a designer to make something that looks designed.
Prototypes. Pitch decks. Landing pages. Marketing one-pagers. App interfaces. You describe what you want, Claude builds it, you refine it through conversation, and you walk away with something that looks like a designer spent a day on it.
It launched April 17, 2026 as a research preview. It's two weeks old. The coverage so far has mostly been hype or designer defensiveness. This guide is neither. It's what you actually need to know to use it well.
What you'll have by the end: A working prototype, slide deck, or graphic — plus an understanding of how refinement and verification work, and a clear picture of what this tool is and isn't for.
What Claude Design actually is
Claude Design isn't one thing. Depending on which mode you use, it builds different kinds of output — all from a prompt, all grounded in code rather than flat files.
Prototype — interactive HTML. Fully functional web output you can click through, present, and hand off to a developer. A landing page you generate isn't a mockup of a landing page. It's a landing page you can open in a browser.
Slide deck — complete presentations in PPTX-exportable format, built through conversation and editable slide by slide.
Other — this is where it gets interesting. The Other tab is where Claude generates standalone images and graphics — social media posts, LinkedIn images, marketing visuals — directly on the canvas. You can generate multiple variations in a single session, each with a different aesthetic direction, and pick the one that works.
The unifying thread: everything lives on a canvas, everything is editable through conversation, and everything can be handed off or exported when you're done.
Who this is for
Four types of person get immediate, obvious value from Claude Design:
The founder who needs a pitch deck tonight and a landing page by Friday. You're not going to hire a designer for either. Claude Design does both in the time it would take to brief someone.
The product manager who needs to show a feature concept before design resources are allocated. Sketch the flow, generate a prototype, share it before the meeting ends.
The marketer who needs a one-pager, a campaign landing page, a social carousel, or a LinkedIn image. Generate four visual directions in one session, pick the one that works, export. No design queue.
The non-technical builder who's prototyping before handing off to Claude Code. The whole loop — idea to prototype to production code — stays inside one ecosystem. Nothing else offers this.
Who it's NOT for right now: Designers working in established Figma workflows who need version history, real-time multiplayer editing, Lottie animations, or pixel-perfect vector export. Those capabilities aren't here yet. Claude Design is for people who were never going to open Figma in the first place.
Getting started
Claude Design lives at claude.ai/design — it's a standalone product, not embedded in the chat interface.
Available on: Claude Pro, Max, Team, and Enterprise. Not available on the free tier. Usage is tracked separately from your chat and Claude Code limits — more on this below.

The left panel has four tabs: Prototype (web designs, landing pages, app interfaces), Slide deck (pitch decks and presentations), From template (pre-built starting points), and Other (standalone images, social graphics, and marketing visuals — generates multiple variations on one canvas). The right panel shows your recent designs, examples, and design systems.
To start a project: pick your type, name it, choose Wireframe or High Fidelity, and click + Create.
Wireframe generates structure and layout without color or polish — useful for flow mapping and early feedback. High Fidelity generates production-quality visual output from the first prompt. For most use cases, start with High Fidelity.
Usage limits — read this before starting
Claude Design tracks usage separately from your chat and Claude Code limits. It has its own weekly allowance that sits alongside your other subscription limits.
The token burn is real and significant. A single complex project — a landing page with interactive elements, iterating through several revisions — can consume a substantial portion of your weekly Pro limit. One writer exhausted 80% of his Pro weekly allowance in 25 minutes. Two sessions used 58% of another user's weekly Pro limit.
Practical implications:
- Start with a complete, detailed prompt rather than iterating from a bare-bones start. More detail upfront = fewer revision cycles = fewer tokens burned.
- Use Tweaks and Edit for visual adjustments rather than regenerating from a new prompt.
- Save full regeneration for structural changes only.
There's a one-time credit for Enterprise users that covers about 20 typical prompts before organizational spend kicks in.
The context step — do this before your first prompt
When you open a new project, you'll see "Start with context" before the canvas. This isn't a loading screen. It's a prompt to give Claude what it needs to produce something that looks like your brand rather than a generic template.
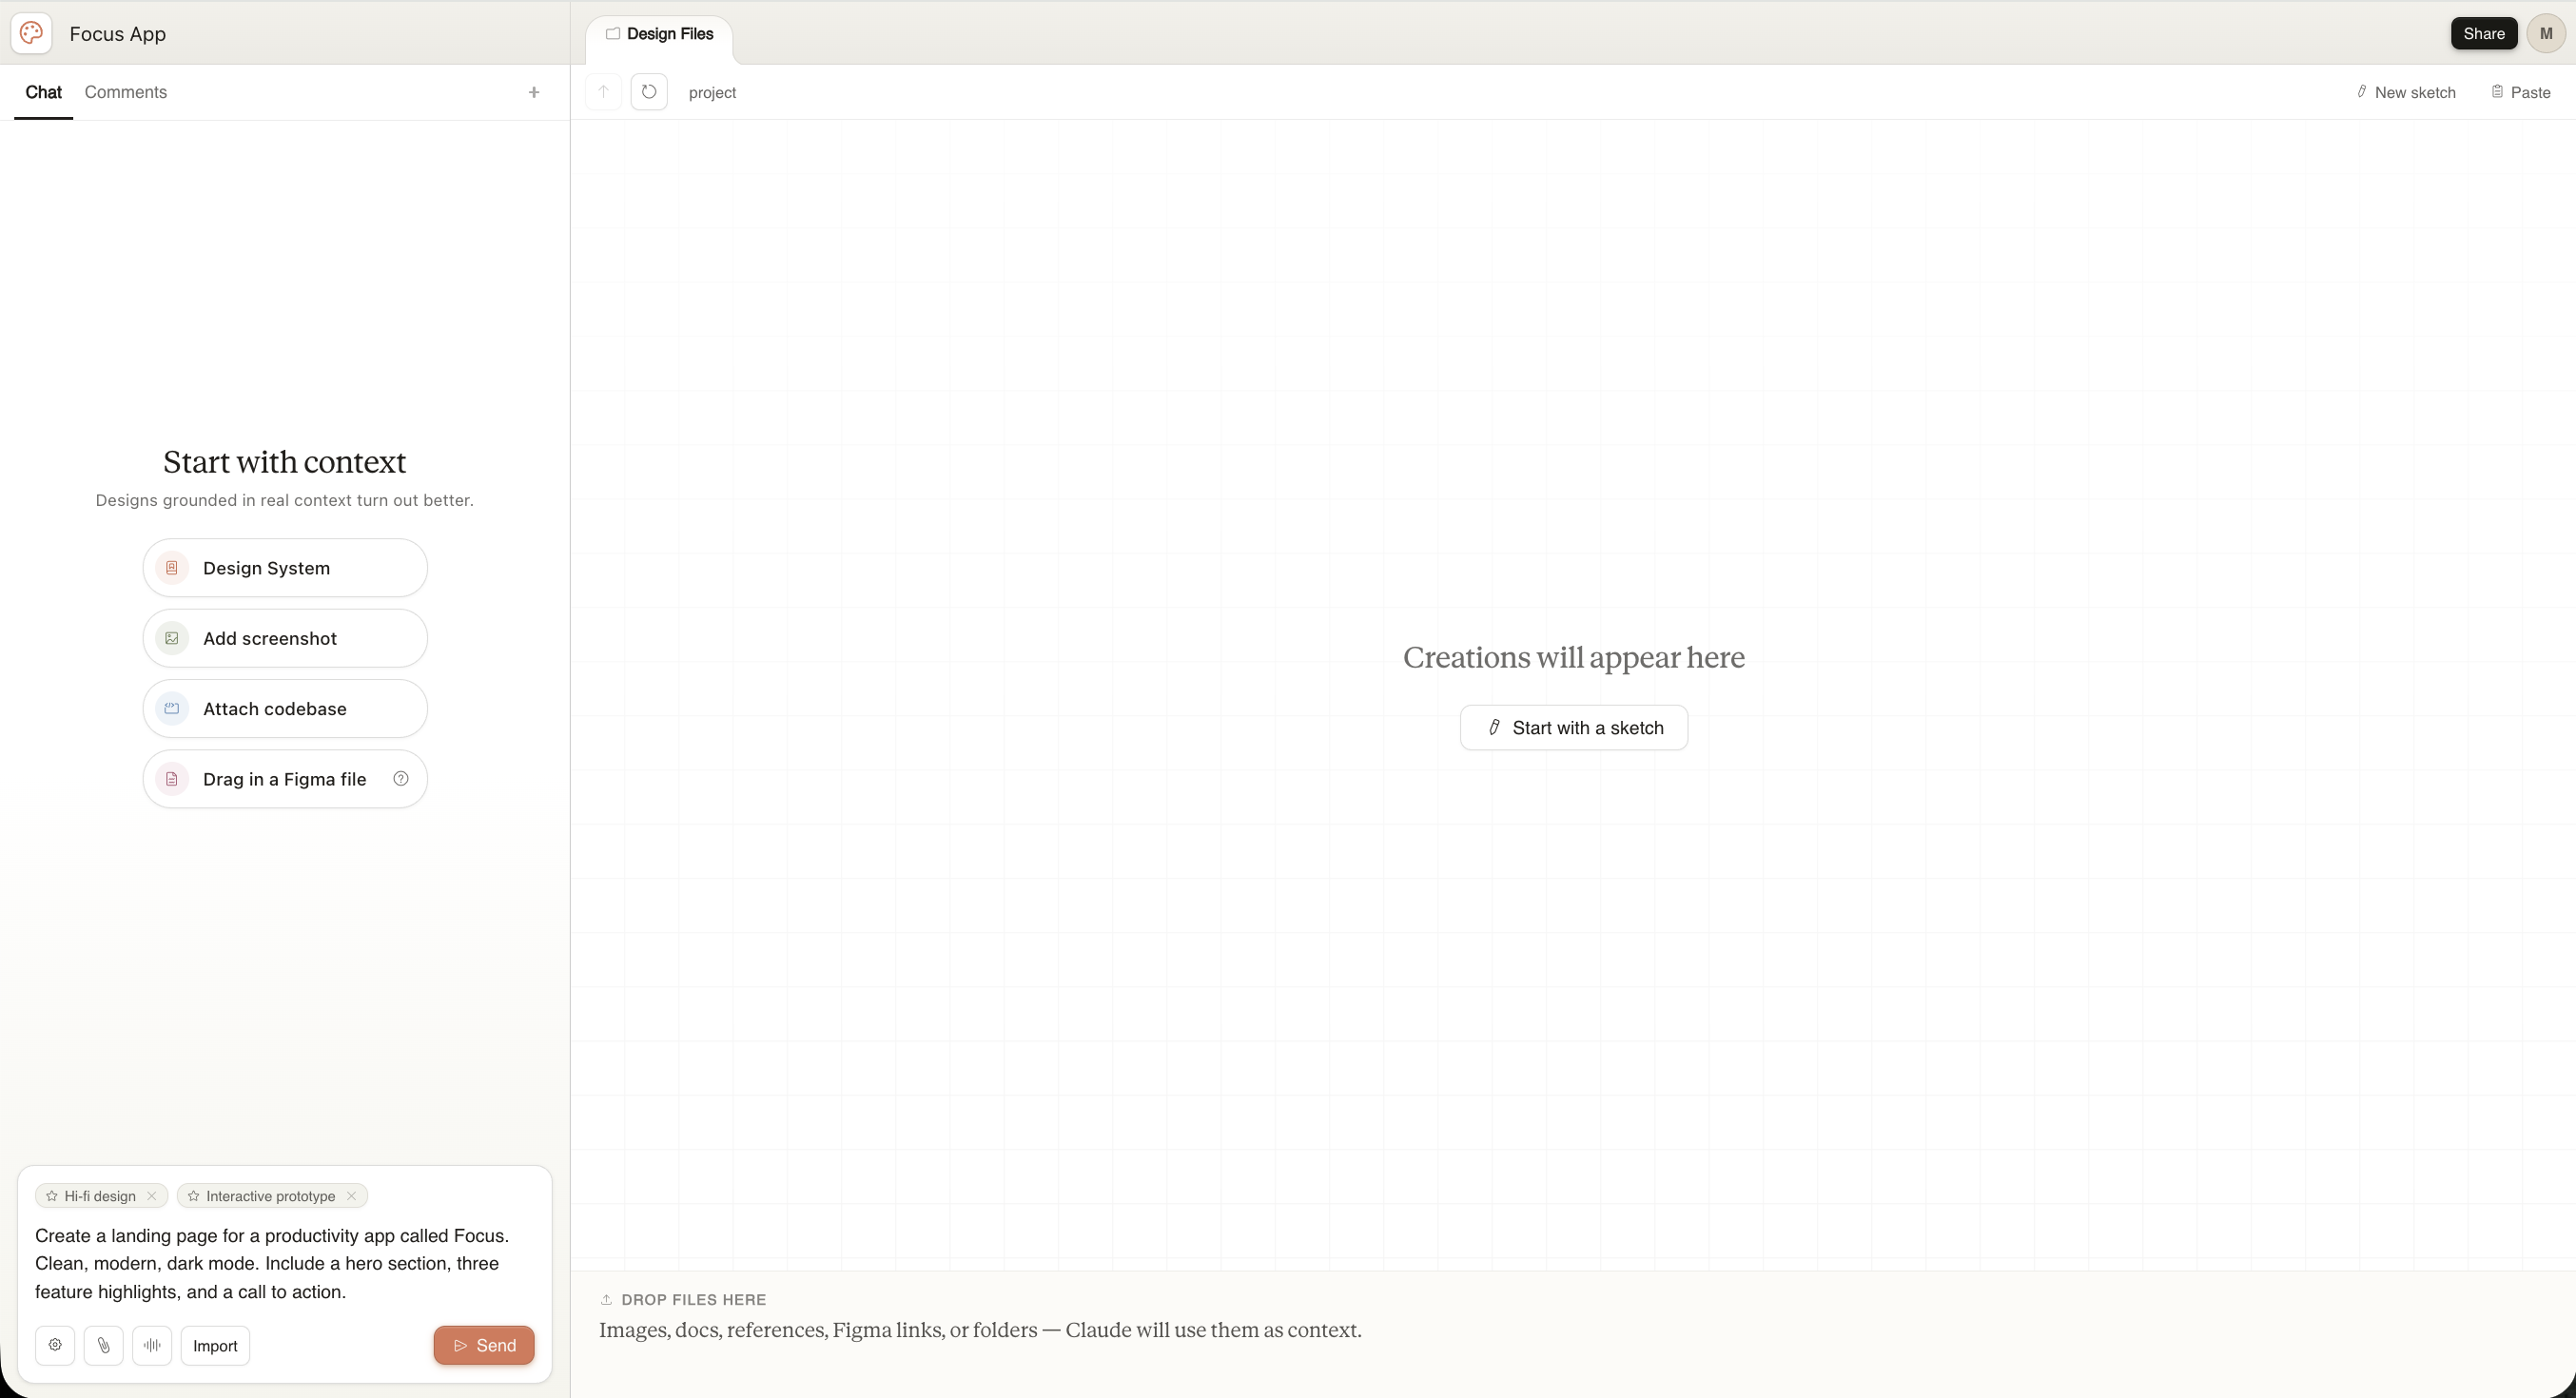
Four options:
Design System — if you've already set one up, Claude will apply your colors, typography, and components to everything it builds automatically.
Add screenshot — paste in a screenshot of your existing product, a competitor's UI, or a reference you like. Claude uses it as visual context.
Attach codebase — point it at your repo and Claude reads your actual components. This is what makes the output match your real product.
Drag in a Figma file — import an existing design file as starting context.
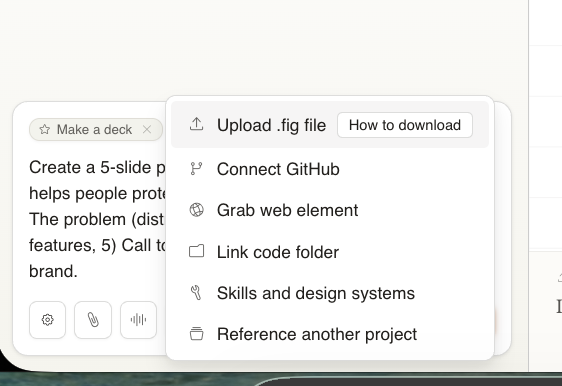
You can also see the Import menu at the bottom of the chat panel, which includes: Upload .fig file, Connect GitHub, Grab web element, Link code folder, and Reference another project.
If you skip this step: You'll get great-looking output that doesn't match your brand. That's fine for a quick prototype. For anything you're going to share externally, take five minutes to connect context first.
Your first prompt
Claude Design accepts context chips at the bottom of the chat — you'll see "Hi-fi design" and "Interactive prototype" already tagged when you start. These tell Claude what mode it's in.
Write your prompt in plain language. Be specific about:
- What it is (landing page, pitch deck, dashboard, etc.)
- The aesthetic (dark mode, minimal, bold, editorial, etc.)
- The content (what sections, what the product actually does)
- Any functional requirements (working buttons, interactive timer, etc.)
Example prompts that produce strong results:
For a landing page:
Create a landing page for a productivity app called Focus.
Dark mode, minimal. Hero with an interactive focus timer
widget, three feature sections, email capture CTA.
For a pitch deck:
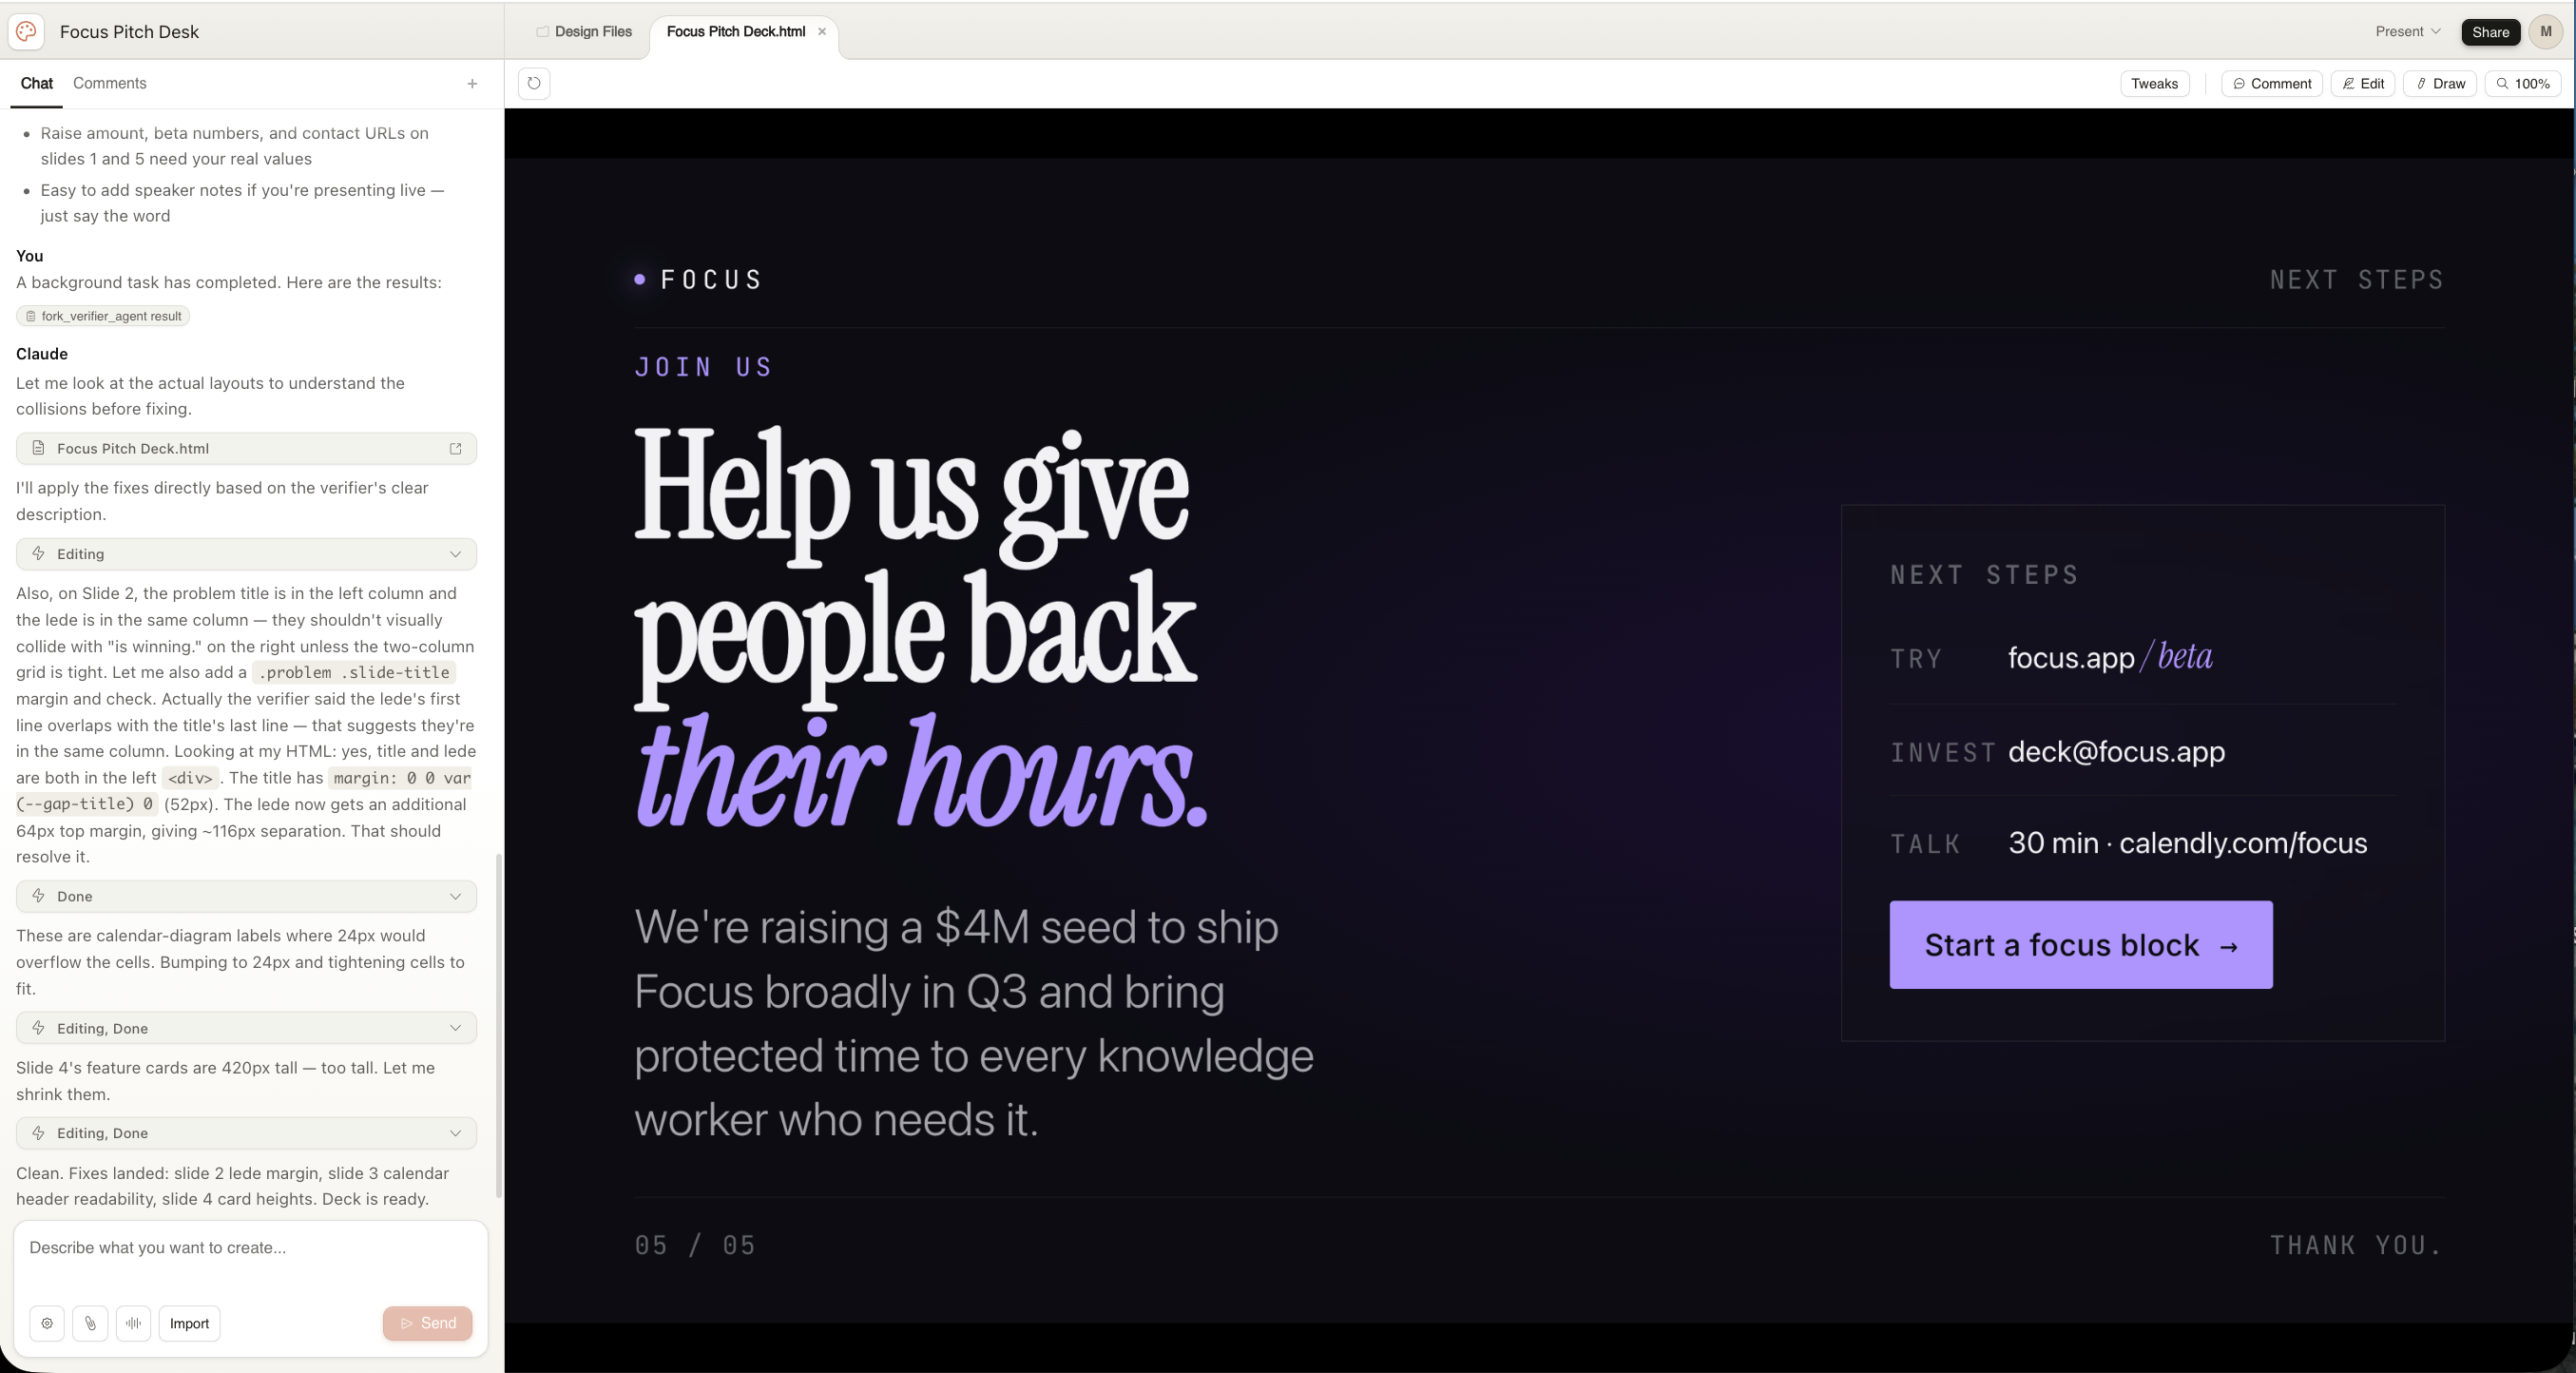
Create a 5-slide pitch deck for Focus, a productivity app.
1) Problem 2) Solution 3) How it works 4) Features
5) Call to action — raise $4M seed.
Dark, high-contrast, serif headers.
For a dashboard:
Design a project management dashboard. Dark mode, sidebar
nav, task list with status indicators, progress chart
at top right. Dense but clean.
Press Send. Generation typically takes a couple of minutes.
What happens during generation
While Claude is building, the left sidebar shows you its reasoning — design decisions, typography choices, motion direction, component list. Read this. It tells you exactly what Claude built and why.
Then something happens automatically:

Verifying. Claude runs its own headless browser to check what it built. It opens the design, looks at it, identifies layout problems — overlapping text, margin collisions, elements that don't render correctly — and fixes them automatically. The chat sidebar shows you what it found and fixed.
Wait for "Clean" or "Done" before evaluating the output. What you see mid-verification is not the final result.
Refining your design
Four modes in the toolbar: Tweaks, Comment, Edit, Draw.
Tweaks — the fastest way to change feel
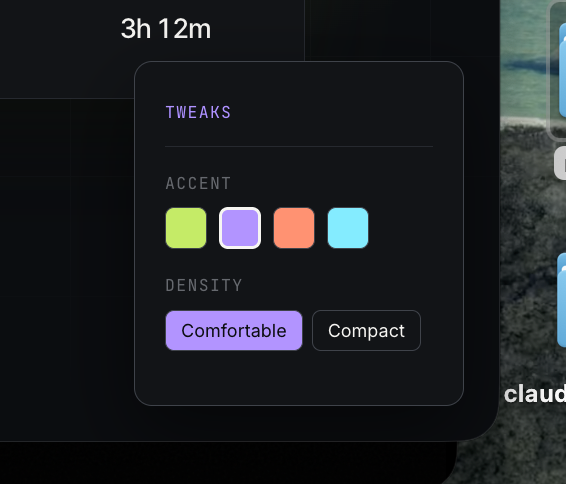
Tweaks are dynamically generated controls specific to your design. For a landing page you might get accent color swatches and density toggles. For a more complex design you'll get more. These aren't fixed settings — Claude built them for this project.
For slide decks, Tweaks works differently. Instead of generating controls, the panel is a direct input to the chat — type what you want adjusted and Claude makes the change.
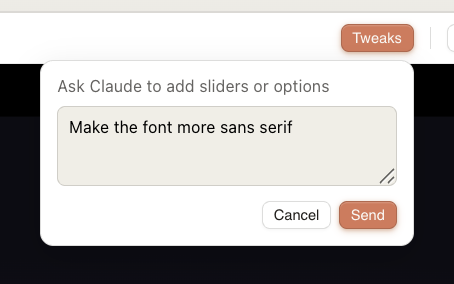
Type "Make the font more sans serif" and hit Send. Your request goes to the sidebar chat and Claude applies the change directly to the slide. Despite the "add sliders or options" placeholder text, no control gets generated — you just get the change.
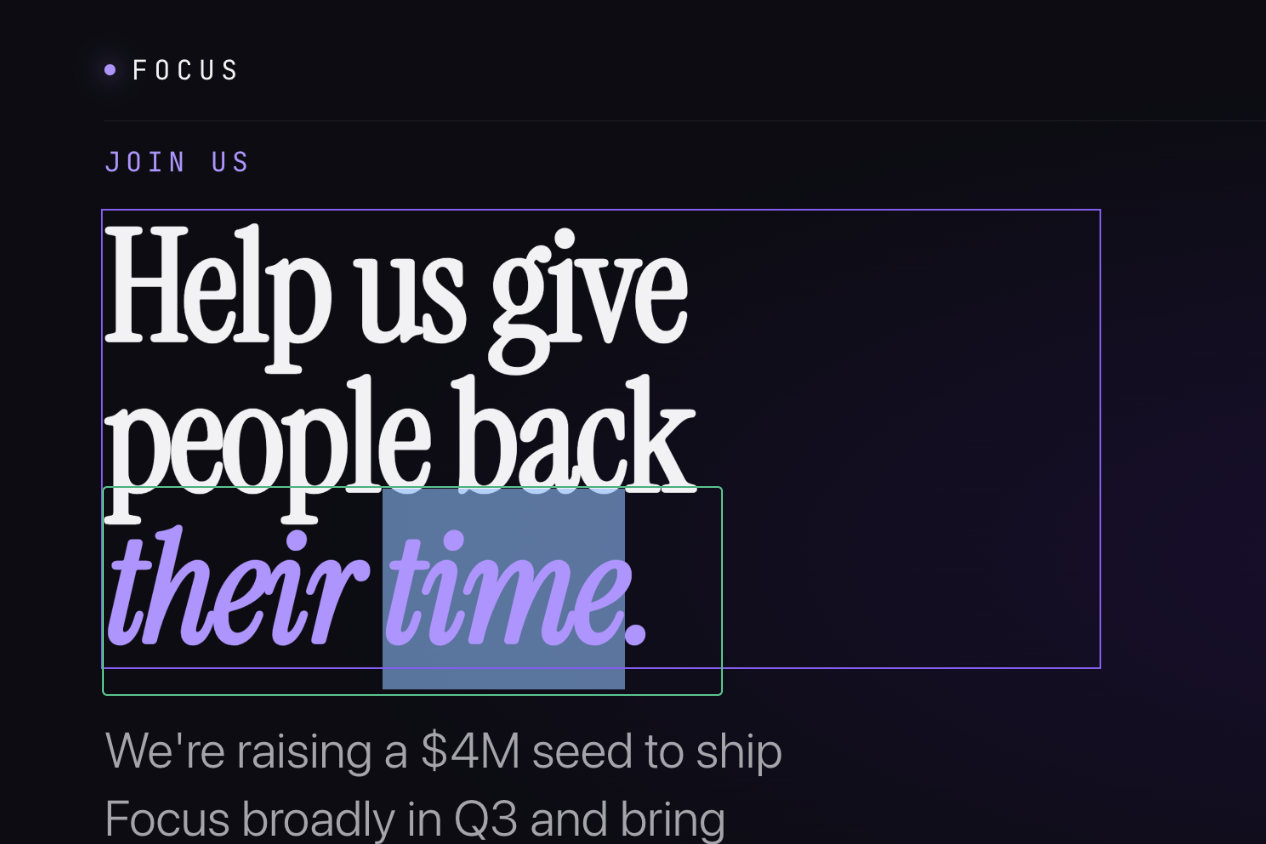
Edit — pixel-level control
Click the Edit tab, then click any element on the canvas. The right sidebar changes to show controls for whatever you selected. Text elements show Typography — font, size, weight, color, line height, tracking. Buttons show Typography plus Size (pixel-precise width/height) plus Box.
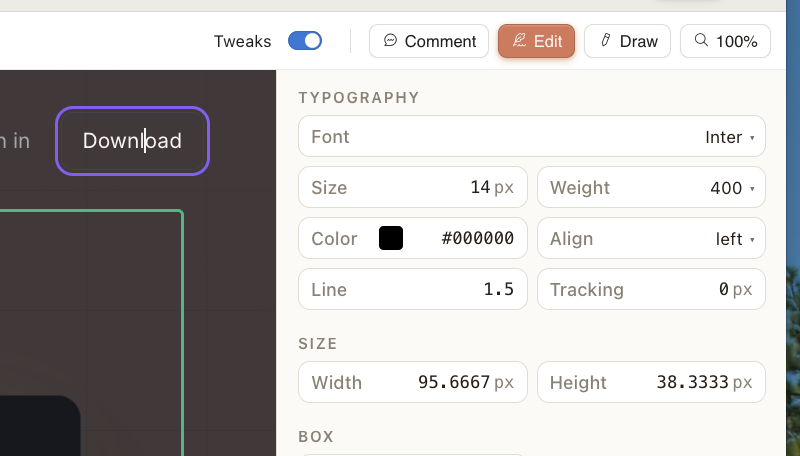
This is closer to Figma's inspect panel than most coverage suggests. Real pixel values, not just vibe adjustments.
Comment + Send to Claude — the most underrated feature
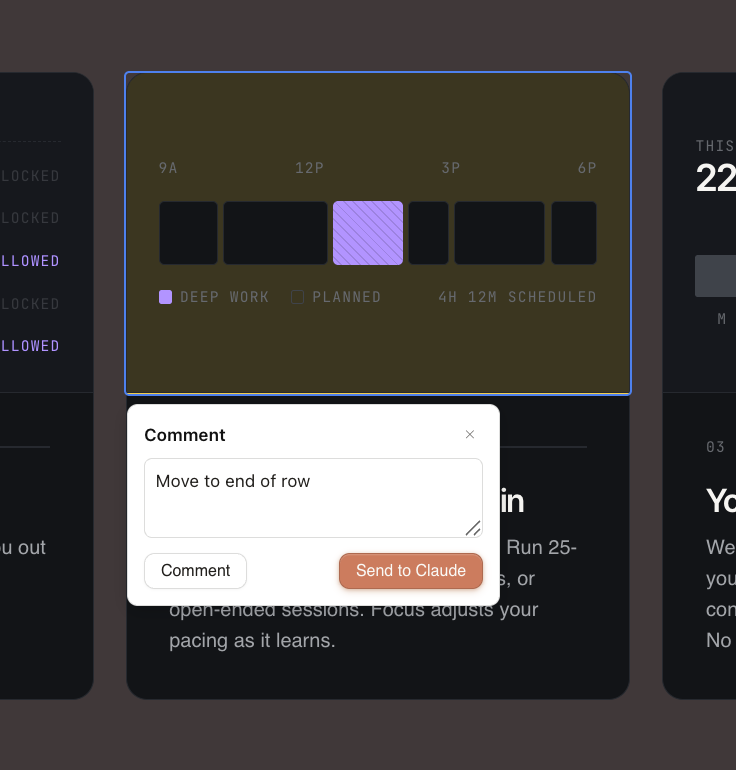
Click the Comment tab, then click any element. You get a text field with two buttons: Comment and Send to Claude.
Comment leaves a note visible to collaborators in the Comments tab. Send to Claude turns your note into a task. Claude reads it, makes the change, and verifies the result.
This means your design review becomes your implementation brief. Write "move to end of row" and click Send to Claude. Done.
Draw
The Draw tool lets you sketch directly on the canvas. Claude interprets hand-drawn additions and converts them to UI elements. Useful for rough layout additions you want to describe visually rather than in words.
Slide decks
Slide decks follow the same workflow as prototypes with one difference at creation: the Use speaker notes / Less text on slides toggle. Enable it and Claude keeps slide content minimal, moving detail to speaker notes instead.

The canvas shows slides full-screen with navigation. The same Tweaks, Comment, Edit, and Draw modes apply. The same verification loop runs — Claude checks its own slide layouts and fixes collisions before presenting the result.
When you're ready to present, the Present button in the top right runs your deck full-screen directly from Claude Design — no export required.
Direct text editing works on slides — click into any text element and edit in place.
Images and graphics
The Other tab is the least-covered capability in Claude Design. Use it when you need a standalone graphic rather than a prototype or deck — a LinkedIn post image, a social media visual, a marketing asset.
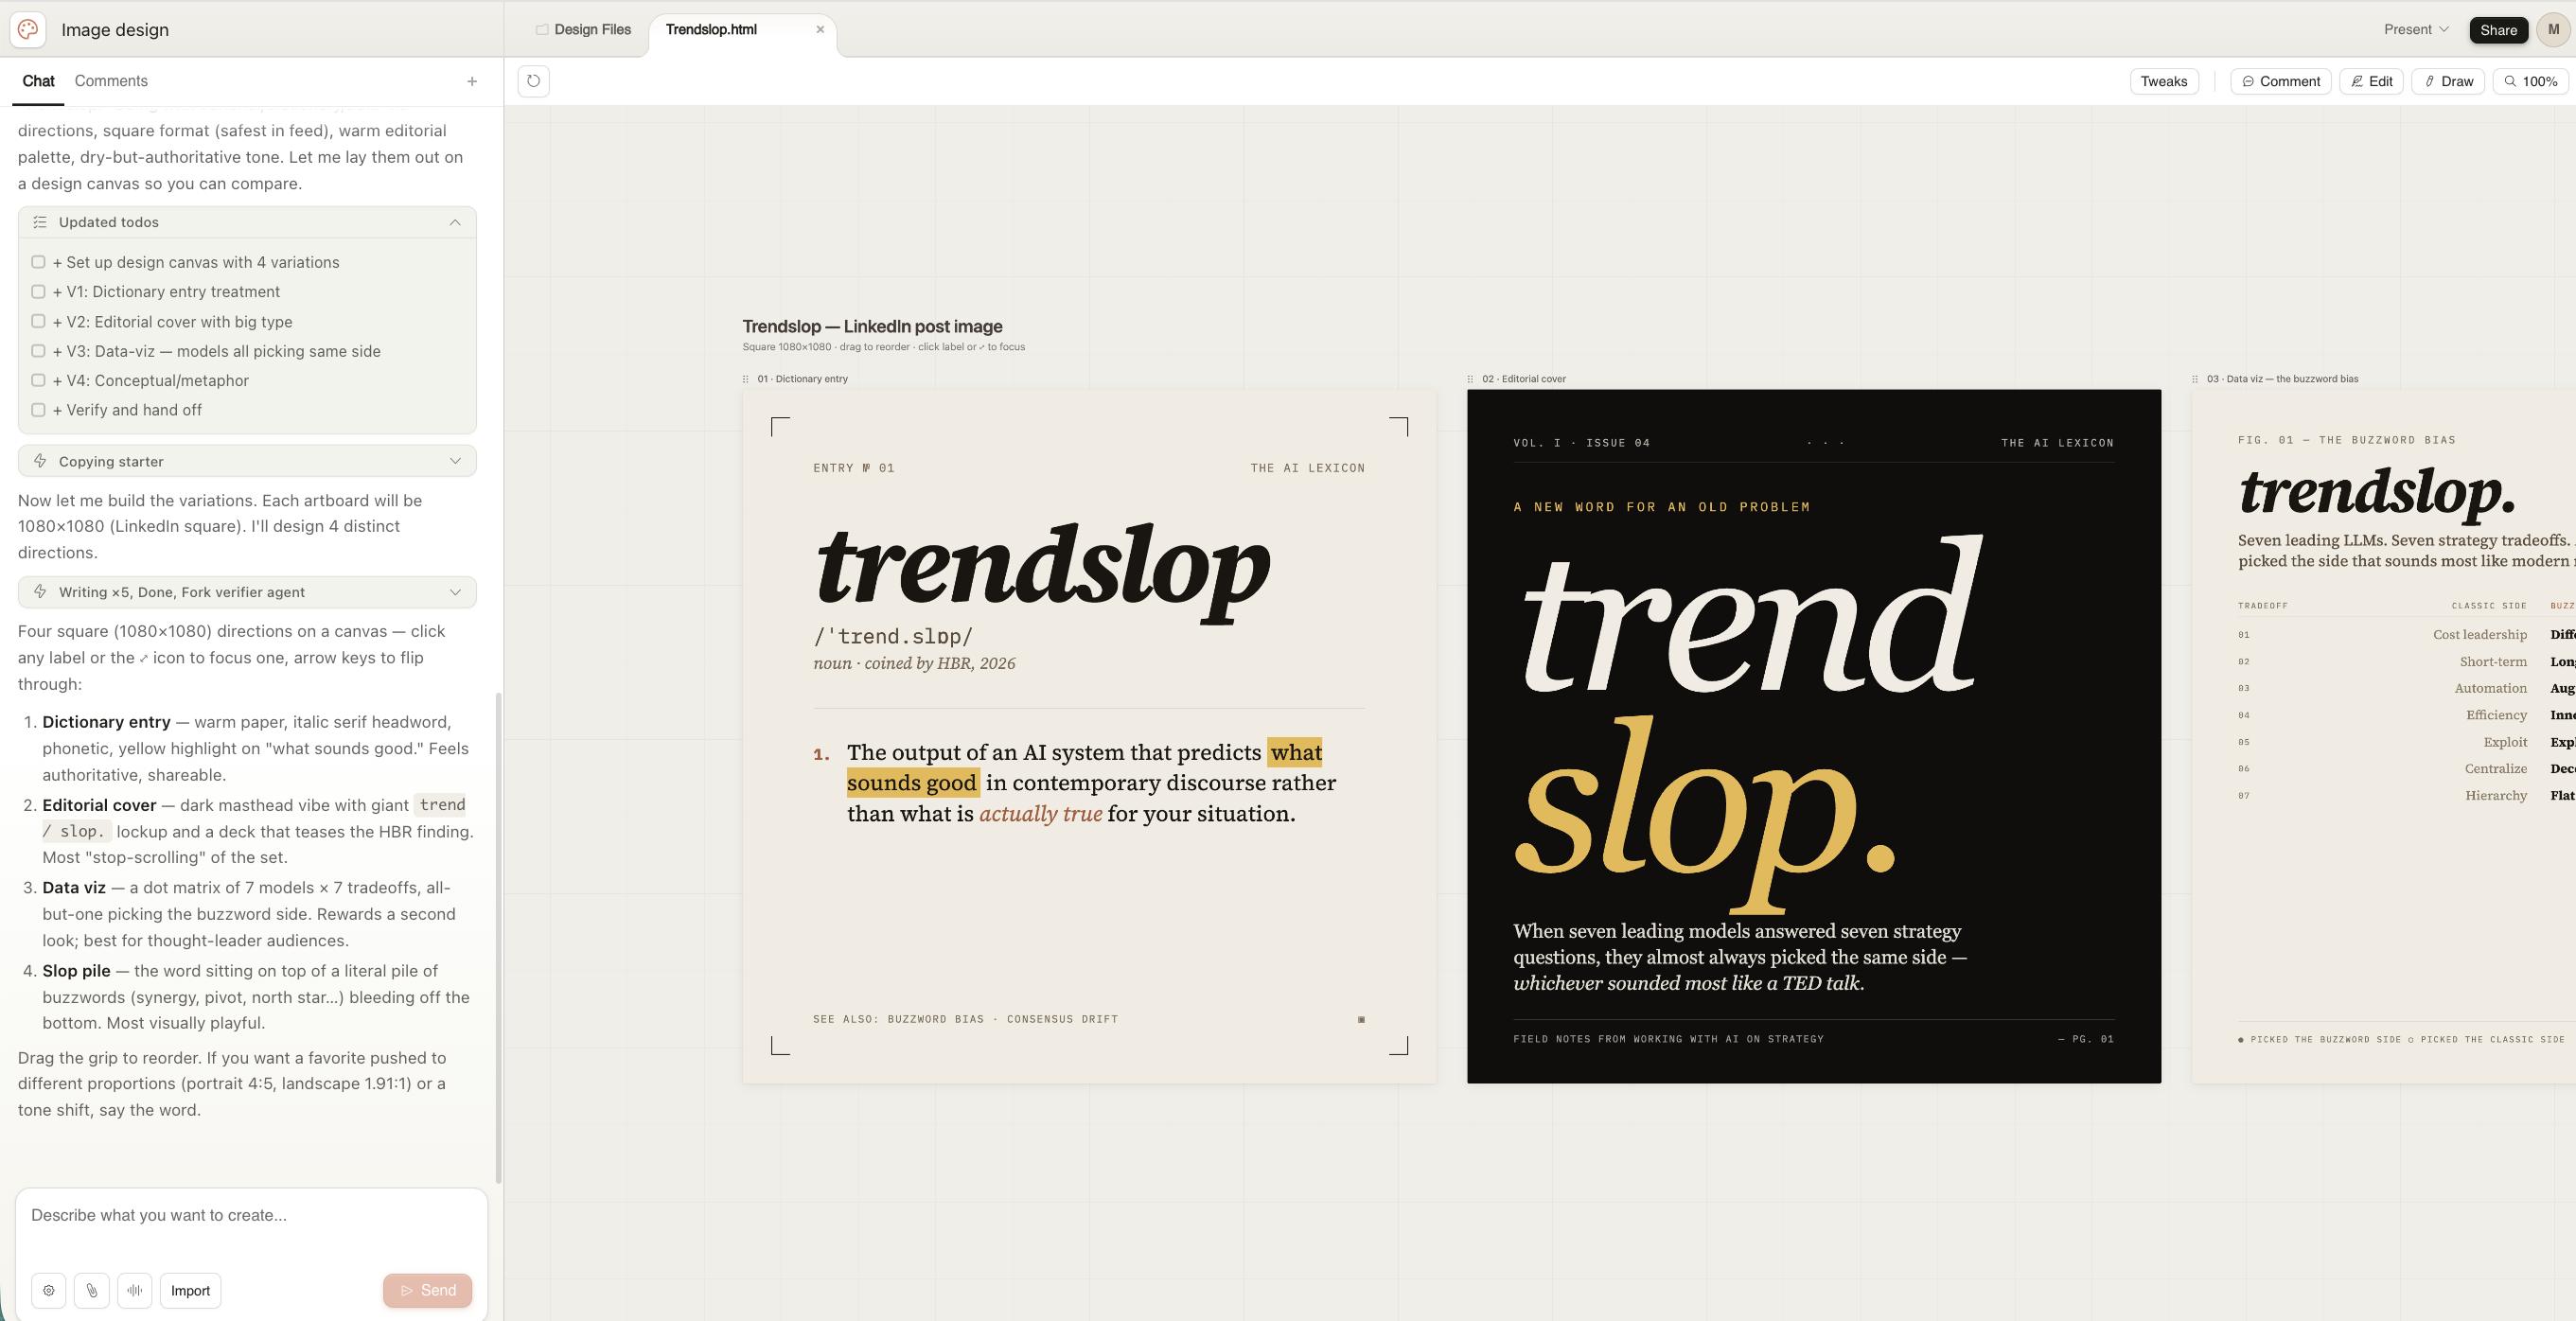
What makes it different from other image generation tools: Claude generates multiple distinct variations in a single session and lays them out on one canvas so you can compare. Each variation is a different creative direction. You pick the one that works, or ask Claude to iterate on a specific one.
The variations shown above — dictionary entry treatment, editorial cover with big type, data-viz dot matrix, and conceptual metaphor — came from a single prompt. That range, in one go, is the capability worth knowing about.
Exporting and sharing
Click Share in the upper right for all sharing and export options.
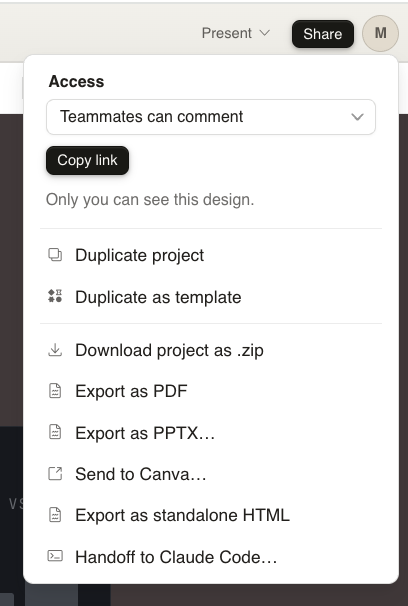
Download as .zip — the full project bundle including the HTML, assets, and README.
Export as PDF — for sharing or printing.
Export as PPTX — opens in PowerPoint or Keynote, fully editable.
Send to Canva — powered by Canva's Foundation Design Model. This produces a native Canva document with real text, layers, and components — not a flattened image. Fully editable and collaborative once in Canva.
Export as standalone HTML — a self-contained file you can open in any browser or drop into a code editor as a reference.
Handoff to Claude Code — the feature that makes Claude Design worth taking seriously.
The Claude Code handoff
This is what separates Claude Design from every other AI design tool.
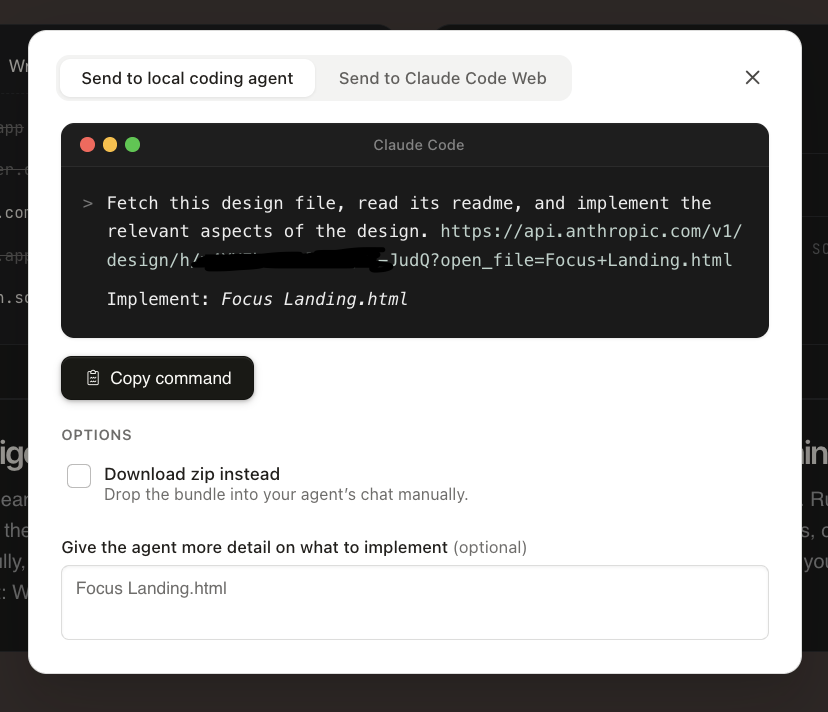
When you click Handoff to Claude Code, you get a terminal-style modal with a pre-built command:
Fetch this design file, read its readme, and implement
the relevant aspects of the design. [URL]
Implement: Focus Landing.html
Copy that command. Open Claude Code. Paste it. Claude Code fetches the design file, reads the README — which includes component proposals, token systems, implementation ordering, and back-compatibility notes — and builds the production code.
The README alone can be 26KB of implementation detail. No other AI design tool produces a handoff like this because no other AI design tool is made by the same company as the coding agent receiving it.
Two options: Send to local coding agent (your desktop Claude Code) or Send to Claude Code Web. You can also add more detail about what to prioritize in implementation.
The design system — the payoff for the context step
You connected your codebase, Figma files, or assets in the context step. Here's what that actually produces.
Claude reads everything you connected and builds a design system — your actual colors, typography, and component patterns. Every project you create after that inherits it automatically. You don't repeat yourself. You don't re-upload assets. Claude just knows.
Find it at the bottom of the left panel on the homescreen: Set up design system.
For teams: once a design system is configured, anyone in the organization can create on-brand designs without being briefed on brand guidelines. That's the enterprise unlock.
What to expect from the output
The first generation will be strong. Often better than expected. The interactive elements will work. The typography will be intentional. The layout will be structured.
It won't be perfect. Expect:
- Some elements not quite where you want them
- Color choices that are close but not exactly yours unless you've connected a design system
- Occasional layout issues the verifier catches and fixes
- Slides that need content swapped in (real numbers, real URLs, real names)
The gap between "first generation" and "ready to share" is smaller than with any tool in this category. That gap is closed through Tweaks, Edit, and Send to Claude — not through regeneration from scratch.
Go deeper
Put Claude to work on your actual tasks: Take the Claude Cowork course →
What AI agents actually are: What Is an AI Agent? →
Published April 2026. Claude Design is in research preview and evolving quickly. Check Anthropic's release notes for updates.
Get notified when we publish new guides. No spam, just useful stuff.